


0xc19a0020 Error Code – HP Officejet Pro 8600 Series Printer
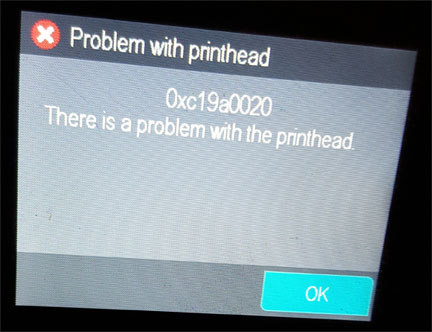 For HP 950, 951 ink cartridge series printer models, the 0xc19a0020 error code (or similar numeric sequence), with accompanying message “Problem with printhead”, represents there is either a printer Ink System Failure, a PRINTHEAD alignment problem or the internal PRINTHEAD has electrically failed. In some cases this error may also be caused by a misplaced smart chip on the refilled ink cartridge; inspect chip for proper alignment (refer to ‘missing or damaged’ errors support page).
TECH FLASH
For refilled HP 950/951 ink cartridge series printer models which display printer/cartridge error messages such as “cartridge missing or damaged”, “cartridge problem”, “cartridge depleted”, etc., there is a new printer firmware update available for your printer model which will enable refilled ink cartridges to function normally. Click on the link below; this will explain the issue & offer a printer firmware download to fix the issue and allow you to continue using refilled ink cartridges: click here
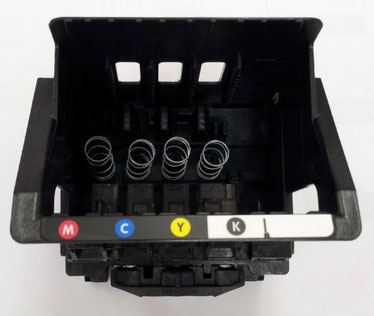
BASIC CHECKS:
Perform the following steps to see if the error state can be cleared:
1. Select PRINTER MAINTENANCE and chose CLEAN PRINTHEAD. Check to see if the print quality test print is generated / successful.
2. Select ALIGN PRINTHEAD to calibrate the printhead. If successful, then test with a different document (via computer).
ADVANCED DIAGNOSTIC TESTS:
It is suggested to perform the following steps before you decide on replacing the printhead or obtaining a new/replacement printer.
1) Plain paper should be used for testing to ensure this is not a paper sensing issue. However, depending on how much you have printed to date, there could be ‘ink mist’ interfering with the media sensor/sensing optics (a very common problem in the large format printer models). Run thru our quick checklist to evaluate all variables that may be causing the issue: https://www.inkjet411.com/?page_id=1999
2) Remove ink cartridge and inspect cartridge’s smart chip surface (i.e. gold contacts) – check for scratches or ink residue. Verify cartridge’s smart chip position is correct – see pictures of cartridge chips at following link for reference: https://www.inkjet411.com/?page_id=1999
– Retest printer using plain paper or a different paper type (standard bond is suggested).
– Replace cartridge if suspected to be physically damaged.
– If smart chip position looks incorrect, return ink cartridge to your refiller for evaluation and/or chip replacement.
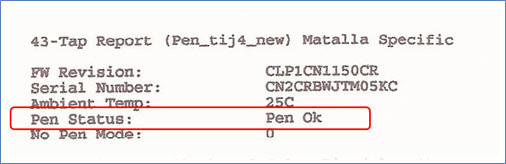
3) Perform Tap 41 (43) PRINTHEAD Health Diagnostics Test, along with supporting service level/diagnostic tests (NOTE: service menu access procedures do vary by HP printer model, refer to HP printer diagnostics document, pages 45-47, to view normal display messages, https://www.inkjet411.com/?page_id=1813 )
Tap 41 PRINTHEAD Health Diagnostics (NOTE: the following procedure applies to touchscreen printer models only):
- Press ‘Return’ button (lower left side) four (4) times until ‘Support’ menu is displayed.

- At ‘Support’ Menu, using the arrow key, navigate to the ‘Service Menu’, press Ok.
- Use arrow keys to advance to the ‘Special Reports’ Menu. Select OK.
- Use arrow keys to advance to the ‘print mech button tap’ menu. Select Ok.
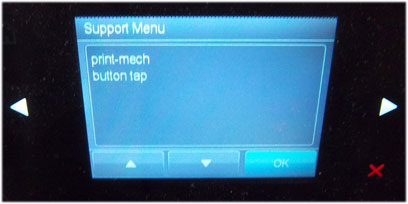
- ‘code = 0’ will be displayed. Use arrows keys to change value to ‘41’ (i.e. press and hold right arrow key).
- When ‘Code = 41’, select ‘OK’. The diagnostic test pattern will print.
- Check the 4th line at the top of the printed report; an electrically good/stable PRINTHEAD will state “Pen Status: Pen OK”………if any other message is displayed then the PRINTHEAD may have failed and may need to be replaced. Re-seat PRINTHEAD and/or clean rear electrical contacts and repeat ‘Tap 41’ test to verify connectivity is not the issue.*
Nozzle test (use to determine if all ink cartridge nozzles/printhead is firing all colors properly)
- Press return arrow 4 times
- Press support menu
- Press right arrow 5 times to print diagnostic menu and press ok
- At nozzle test press ok
Self test/printer status (use to print internal printer settings)
- Press return arrow 4 times
- Press support menu
- Press right hand arrow 7 times to reports menu and press ok
- At self test report press ok
Extended self test (use to evaluate color performance and obtain total page count)
- Press return arrow 4 times
- Press support menu
- Press right hand arrow 7 times to reports menu and press ok
- Press right hand arrow 1 time to extended self-test and press ok
Print Quality Diagnostic Page (use to determine if printing alignment is correct)
- Press return arrow 4 times
- Press support menu
- Press right hand arrow 7 times to reports menu and press ok
- Press right hand arrow 2 times to Print Quality diagnostic report and press ok
Print head recovery (runs ‘intensive’ printhead service cleaning routines, i.e. for a clogged printhead)
- Press home key twice

- Then return key
- Then home key twice
- Then return key
- Then home key twice……………this will gain access to the Engineering Menu
- Press the ‘service menu’
- Press right arrow 4 times to ‘service test’ and press ok
- Press right arrow:
- 16 times to ‘print head rec level 1’ (basic recovery)
- 17 times to ‘print head rec level 2’ (medium recovery)
- 18 times to ‘print head rec level 3’ (thorough recovery)….suggested for severe streaking
- Press ‘ok’ to activate either of the 3 selections above.
Semi full reset (can be used to help address intermittent or incorrect printer behavior issues)
- Press return arrow 4 times
- Press support menu
- Press right hand arrow 2 times to Resets menu and press ok
- Press right hand arrow 2 times to semi full reset and press ok (Note: this will return printer to factory default condition; regional setup will be required following this action)
* An internal electrical failure of the PRINTHEAD generally has nothing to do with refilled ink cartridges as failures will normally occur over time and with average print use. The PRINTHEAD assembly is a separate electronic unit in which the cartridges plug into and feed ink into.**
4) To rule out printer/cartridge connectivity (i.e. PRINTHEAD assembly interface/connection) issues please ensure you have followed all steps on HP’s support page – this includes PRINTHEAD removal and thorough cleaning of the electrical surfaces on the PRINTHEAD and on the CARRIAGE ASSEMBLY:
5) Remove all 4 ink cartridges, then remove the internal PRINTHEAD and thoroughly clean rear electrical contacts and carriage electrical contacts. Inspect ink foam ports to see if they are ‘wet with ink’…this will confirm whether ink is being pulled into the PRINTHEAD or not. If the ink foam ports are completely dry (no significant amount of ink present when blotted with a paper towel, etc.), then the PRINTHEAD is likely considered too dry to support proper ink flow and subsequent printing operations. Refer to PRINTHEAD removal process at HP.com (see link above).
6) If after thorough electrical contact cleaning the problem persists, you may need to replace the PRINTHEAD ASSEMBLY (i.e. Amazon), however, as a last ditch effort, you might want to perform a hot water flush on the PRINTHEAD:
- Remove all ink cartridges from the printer.
- Remove the PRINTHEAD – for most printer models you will need to pull up on the lever adjacent to carriage assembly to unlock the printhead (NOTE: printhead cannot be easily removed on 8100 series printer models as partial printer dis-assembly is required). Lift printhead straight up to remove.
- Over a sink, run warm tap water directly into the 4 ink ports for approximately 2 minutes – this will effectively saturate the foam ports and blow ink out/thru the nozzle plate bottom.
- Using a lint-free towel, remove water from rear/bottom electrical contacts. Ensure printhead electrical contacts and exposed surfaces are fully dry.
- Install the printhead into the printer. You may observe a “Replace Printhead message” so you will need to cycle printer power by turning printer off and then on to clear the error.
- Install ink cartridges and retest printer. You should observe a New PRINTHEAD alert message followed by an approx. 4-minute preparation countdown prompt.
- If permissible, activate the ‘Clean Printhead’. This can be done from the printer’s control panel or software printer driver (for example, by selecting ‘Tools’ – ‘Clean Printhead’, or similar).
- If you have reached this point of the troubleshooting and all the previous troubleshooting steps did not work, then the printhead is likely damaged or at end of life* and may need to be replaced.
NOTE: If you are unable to remove the PRINTHEAD assembly then consult your User’s Guide for specific instructions or refer to HP.com.
7) If this does not remedy the problem, then you may have a defective PRINTHEAD in the printer (worst case scenario), unrelated to the refilled cartridges.**
—-
ADDITIONAL NOTES:
However, if you observe missing colors or poor image quality then air may have been accidentally ingested into the ink lines between the cartridge(s) and PRINTHEAD. To recover from this problem, you will have to run the “Clean Printhead” procedure 2-3 times to recover the ink system. Watch the video on the HP support page which describes some of the common issues you may encounter with refilled ink cartridges. This type of problem is common and completely recoverable.
https://www.inkjet411.com/?page_id=1991
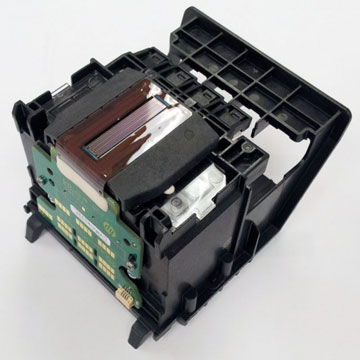
NOTE 1: The HP 950/951 ink-series printer models have an electronic PRINTHEAD within the base of the carriage assembly (responsible for pulling ink from the 4 ink cartridges and then firing the ink droplets onto the paper) – these will eventually fail depending on print usage type and printer duty cycle (i.e. generally rated for an estimated 20,000 printed pages over printer life, but the consumer average may typically be closer ~10,000 pages over life). The printhead is replaceable and genuine parts can be ordered from Amazon, or similar. For information on how the PRINTHEAD functions, please watch the following video: https://www.inkjet411.com/?page_id=2054
**Typically the printhead should not reach it’s end-of-life until after a minimum of 8 or more complete sets of cartridge changes. While some printheads may last 20,000+ pages others may only last 4000 pages, actual results will vary. The printhead will eventually fail in time due to an internal micro-electronics failure, due to the following leading factors: general customer print usage and printer care, printer duty cycle (i.e. # pages printed per month), printing frequency (i.e. time between each print job), print mode (i.e. draft vs. normal) and content printed (i.e. photos vs plain pages) and color mode (black and white only vs. color/greyscale printing).
https://www.inkjet411.com/?page_id=2934
Paper types used (i.e. plain paper, photo papers & matte/heavy bond papers) and paper edge curl (i.e. duration in printer and/or exposure to low relative humidity) can also quickly lead to premature printhead failures due to physical ‘head strikes’ of the paper edges making repeated contact with the printhead nozzle plate surfaces.
Printhead Life
The built-in PRINTHEAD will eventually fail over time with usage and age (may or may not be replaceable depending on printer model – see User Manual)
To learn more about Printhead Function & Failure conditions, please select your printer model:
HP OfficeJet Pro 8100 Printer ( N811a ), HP OfficeJet Pro 8600 Printer ( N911a ), HP OfficeJet Pro 8600 Plus Printer ( N911g ), HP OfficeJet Pro 8600 Premium Printer ( N911n ), HP OfficeJet Pro 8100 Printer ( N811d ), HP OfficeJet Pro 8610 eAIO Printer ( A7F64A ), HP OfficeJet Pro 8620 eAIO Printer ( A7F65A ), HP OfficeJet Pro 8630 eAIO Printer ( A7F66A ), HP OfficeJet Pro 251dw Printer ( CV136A ), HP OfficeJet Pro 276dw MFP Printer ( CR770A ), HP OfficeJet Pro 8610 eAIO Printer ( E1D34A ), HP OfficeJet Pro 8615 eAIO Printer ( D7Z36A ), HP OfficeJet Pro 8616 eAIO Printer ( J5T77A ), HP OfficeJet Pro 8625 eAIO Printer ( D7Z37A ), HP OfficeJet Pro 8640 eAIO Printer ( E2D42A ), HP OfficeJet Pro 8660 eAIO Printer ( E1D36A ).
Advanced Printer Diagnostics
To view advanced diagnostics tests for your HP printer, click here:
—
 To find the nearest ink refill center near you…


