


HP 902, 902XL Ink Cartridge Errors
TECH FLASH
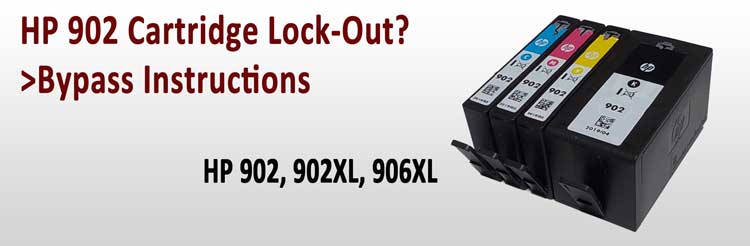
HP 902, 902XL Cartridge Lock-Out: Bypass Instructions
Installation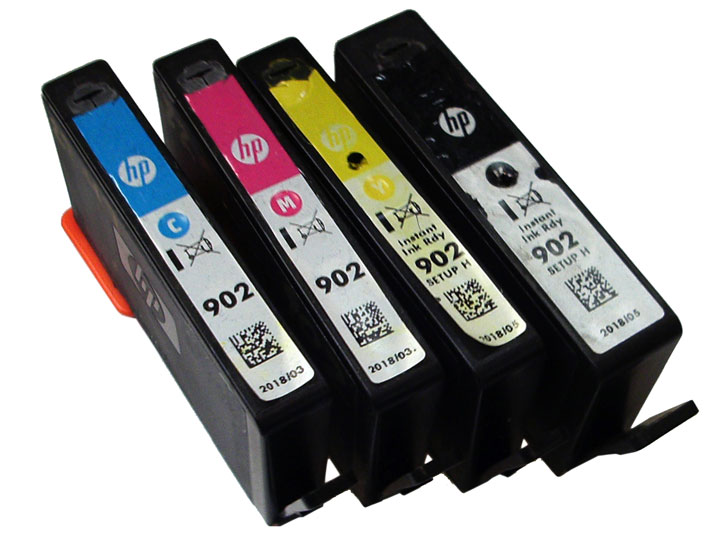
Remove orange cap and insert cartridge into your printer.
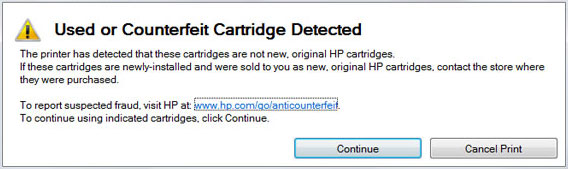
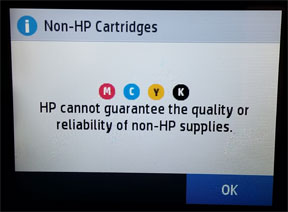
NOTE: ‘Counterfeit cartridge’, ‘Fraud cartridge’ and ‘Non-HP cartridge’ alerts are COMPLETELY NORMAL for all HP 902, 902XL ink cartridges which have been refilled and first installed into the printer. You may observe these one-time error messages after the ink cartridge(s) is initially installed into the printer – you may bypass/ignore these messages by selecting ‘OK’/’CONTINUE’, etc.
NORMAL Cartridge Errors
Your printer/computer may show an “Used HP Cartridge” message. Press ‘OK’ to dismiss this prompt. Additional alert messages, such as “Used HP Cartridge”, “Non-Genuine Cartridge”, “Non-HP Cartridges” or “Counterfeit”/”Fraud” may also be displayed. Press ‘OK’ or ‘Dismiss’ to bypass these prompts.

ABNORMAL Cartridge Errors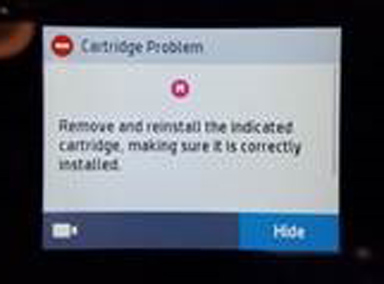
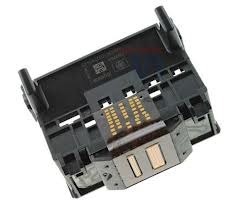
For HP 902, 902XL cartridge errors such as “Cartridge Problem”, “Missing or damaged”, “Cartridge Error”, “The following cartridges are not intended for use in this Printer”, etc. then the printer is not recognizing the cartridge’s ‘smart chip’ which is affixed to the rear side of cartridge or the ink cartridge’s plastic tab is not properly locking the cartridge into the printer’s PRINTHEAD assembly.
———-
ADDITIONAL TROUBLESHOOTING
If the HP cartridge error condition persists (i.e. ‘missing or damage’ errors, etc.) then the error may be caused by cartridge to printer connectivity.
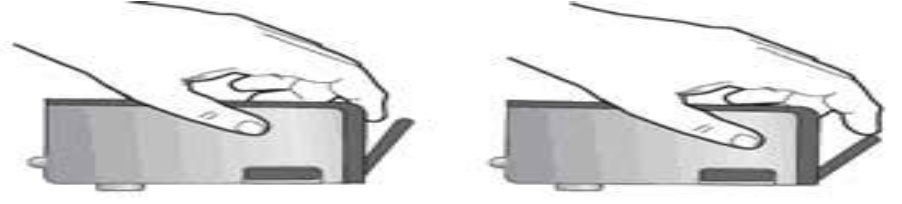
1) Ensure cartridge is fully locking into position and cartridge’s plastic tabs are properly aligned – pull out on latch to ensure it is extending away from cartridge body. Be careful not to bend the tab out more than 1.27 cm (0.5 inches). Moving the tab too far might damage the cartridge or cause the tab to break off.
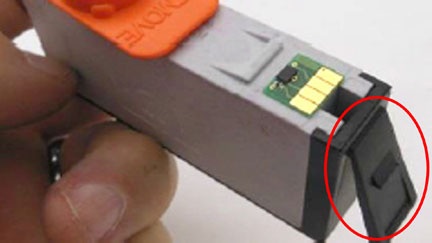
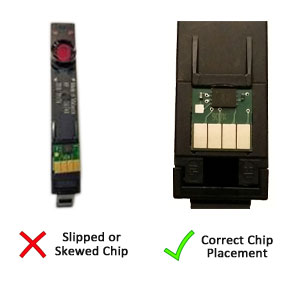
2) The issue may be caused by a slipped or skewed chip issue. Remove the refilled cartridges and inspect cartridge’s smart chip for proper placement and alignment. Return cartridge to refill lab if this condition is present.
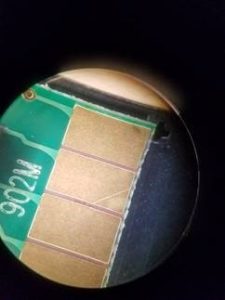
3) The issue could be caused by a scratched chip (see photo below of a scratched chip which resulted in a cartridge error condition). Ensure no DEEP scratches are visible on chip surfaces. Return cartridge to refill lab if this condition is present.
4) Install brand new HP original cartridges to completely rule out the refilled cartridge/chip detection issue.
5) If a cartridge detection issue continues, return to ink refill lab and request to have the cartridge/chip evaluated.
———–
Printer Model Troubleshooting:
HP OfficeJet 6951 Printer, HP OfficeJet 6954 Printer, HP OfficeJet 6962 Printer, HP OfficeJet Pro 6968 Printer, HP OfficeJet Pro 6970 Printer, HP OfficeJet Pro 6975 Printer, HP OfficeJet Pro 6978 Printer,
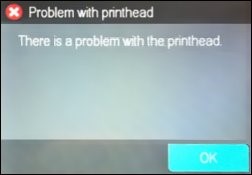
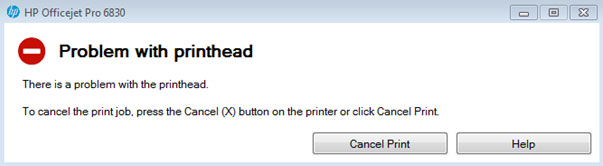
 “PRINTHEAD” PROBLEM TROUBLESHOOTING
“Printhead Failure, “Problem with printhead“, “Ink System Failure” or “0xc19a0020” printer errors typically indicate there is an electrical problem with the internal PRINTHEAD or with PRINTHEAD connectivity (i.e. there is an alignment problem with the internal PRINTHEAD, it may have ingested air from one of the ink cartridges or it has electrically failed) but it could also be caused by a simple mis-alignment (skew) of a cartridge’s smart chip.
An “Incompatible Printhead” or “Alignment Failed” error message is NOT an ink cartridge error, but instead a possible failure of the PRINTHEAD assembly used for firing all four colors onto the paper.
It is first suggested to return your ink cartridges to your ink refiller and request to have them weighed to ensure an adequate amount of ink is inside.
Suggested Solutions
The contact between the ink cartridge and the printer must be clean for proper functioning. If any dirt, ink or paper dust is on the contacts, the printer may indicate that the ink cartridge is bad and/or cause a PRINTEAD error message to be displayed. To ensure a clean contact, follow the steps below:
Step 1: Remove and re-install the cartridge
- Turn the printer on; open the printer to access the print cartridges.
- Remove the suspect cartridge(s) from the station.
- Re-install the cartridges in their stations.
- Close the printer.
- Turn off the printer for 30 seconds and then turn it back on.
- Print a test page following your printer’s instructions.
- If this does not work, please proceed to step 2.
Step 2: Re-set the printer:
2.a. If the cartridges have been evaluated and step 1 above completed, if the problem continues perform a “printer reset”. This can correct an electronic flag setting inside the printer telling it that the print cartridge is problematic. Often times it simply involves turning off your printer and unplugging it for at least 30 seconds.
2.b. Perform Semi-Full printer reset.
2.b.1. First ensure the Home Screen is displayed (screen lit up and visible). Select the printer’s buttons in the following order to gain access into the service menu, please note the buttons/incons at left side of screen will NOT be illuminated:
- Back
- Home
- Back
- Home
- Home
2.b.2. The ‘ENGINEERING MENU’ should be displayed.
2.b.3. Select ‘RESETS MENU’, press OK.
2.b.4. Scroll to “Semi-Full Reset” and select OK to reset the printer. NOTE: For erratic printer operations, this might return the printer to normal operations.
2.b.5. Refer to diagnostic test file for additional printer model specific instructions, click here:
2.c. Print a test page to determine if the problem has been resolved.
2.d. If a printing-related problem persists, refer to Step 3.
Step 3: Perform Tap 41 PRINTHEAD Diagnostics Test:
If you observe substandard print quality from your printer and you have already performed ‘nozzle checks’ and multiple ‘printhead cleaning’ procedures, then activate the Tap 41 PRINTHEAD Health Diagnostics Test to check the electrical health of the built-in printhead assembly.
3.a. First ensure the Home Screen is displayed (icons visible). Select the printer’s buttons in the following order to gain access into the service menu. NOTE: note the buttons are NOT illuminated:
- Back
- Home
- Back
- Home
- Home
3.b. The ‘ENGINEERING MENU’ should be displayed.
3.c. Select ‘SERVICE MENU’ to gain access to various diagnostic printer tests.
3.d. Scroll to ‘Special Reports’ menu and select “Print-mech button tap” menu. Enter ‘code=41’ by increasing the values using the arrow keys. When code = 41 is displayed, then select OK.
3.e. A special service test report should begin to print in black ink. Check the 4th line from top of the printed page, ‘Pen Status’ should state “Pen OK” (printed out as ‘Pxx Sxxxxx‘ stating Pxx Ox‘). If ‘Pxx Bxx‘ (Pen Bad) is displayed then the internal PRINTHEAD has electrically failed.
—-
Minor Print Quality Issues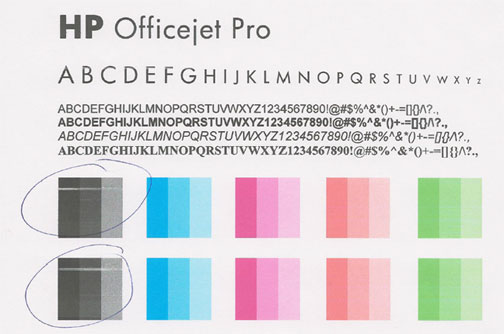
If you observe missing colors or poor image quality then air may have been accidentally ingested into the ink lines between the cartridge(s) and PRINTHEAD. To recover from this problem, you will have to run the “Clean Printhead” procedure 2-3 times to recover the ink system. This type of problem is common with older printers but is completely recoverable.
To activate, at the printer’s control panel, select the small GEAR icon, select ‘Printer Maintenance’, select ‘Clean Printhead‘. You may need to perform this action several times; this will draw some ink from the cartridges and into the PRINTHEAD to help reestablish ink flow and return print quality to normal.
If the problem continues then it is suggested to return your ink cartridges to your ink refiller and request to have them weighed to ensure an adequate amount of ink is present inside.

Severe Print Quality Issues or Missing Colors
If any streaks or missing colors appear on prints, initiate a ‘Clean Printhead’ via the printer control panel ‘Setup’/’Tools’ menu. On some printer models, the ‘Clean Printhead’ procedure will yield a test pattern – inspect pattern to ensure all colors are firing and solid bands of color appear. With other printer models you will need to select a test/diagnostic print under the ‘Tools’ menu. You may need to perform the ‘Clean Printhead’ procedure several times if the printer has been idle or rarely used.
Improve PRINTHEAD Ink Flow:
a. Turn on the printer; open the printer to access the ink cartridges.
b. Remove all 4 ink cartridge(s) from the carriage.
c. Using an eye-dropper filled with distilled water, gently squeeze 10-15 drops of water into the respective ink port that you believe is causing the issue (cyan, magenta, yellow and/or black).
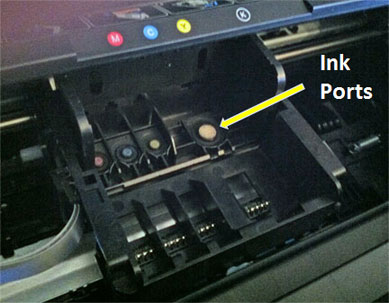
d. Re-install ink cartridges.
e. Initiate a ‘Clean Printhead‘. To activate, at the printer’s control panel, selec the small GEAR icon, select ‘Printer Maintenance’, select ‘Clean Printhead’. You may need to perform this action several times; this will draw some ink from the cartridges and into the PRINTHEAD to help reestablish ink flow and return print quality to normal.
e. Print a PRINT QUALITY TEST page to determine if the problem has been fixed.
If missing colors or severe/poor print quality continues to be observed, then please refer to advanced corrective actions:
For refilled HP 902 cartridges which are not in use, ensure the orange protective cap is securely attached to bottom of cartridge (covers ink spout) to prevent cartridge from drying out. CAUTION: If the internal foam is allowed to dry out then cartridge recovery may be difficult and possibly unusable. While it is normally suggested to use tank-based cartridges one (1) year from the refill date, it is recommended to use refilled HP 902/902XL cartridges within 90 days to avoid print quality issues. 
Printhead Life
The replaceable or non-replaceable PRINTHEAD will eventually fail over time with usage and age. Check User Manual to determine if your printer’s Printhead can be removed/replaced.
Advanced HP Printer Diagnostics:
To view advanced diagnostics tests for your HP printer model, click here:


