


HP 63, 63XL Ink Cartridge Errors
NOTE: “Empty”, “Low Ink”, “Out of Ink“, “? Marks“, “Counterfeit” and “Non-Genuine Cartridge” alerts are COMPLETELY NORMAL for all HP 63 & HP 63XL black and color ink cartridges which have been refilled!
While at first this may be an unusual workflow, it does allow print operations to proceed.
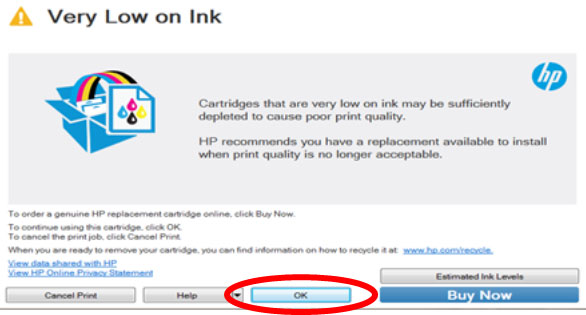
Select ‘Ok’ to bypass “Low Ink” messages displayed on the computer.
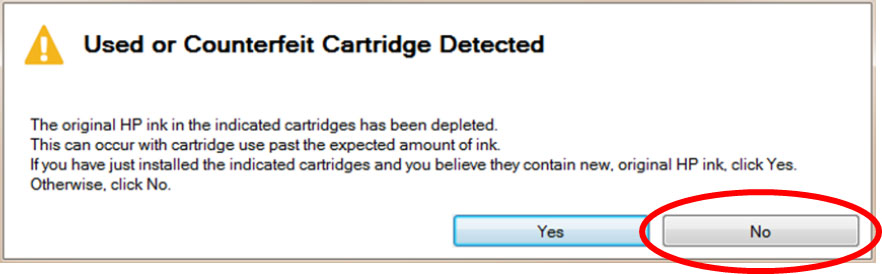
If the computer displays the following message, select ‘No’ to bypass warning prompt.
3 Types of Alert Messages:
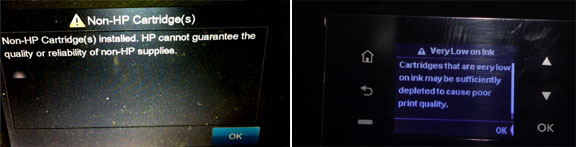
– Information Alerts. When a refilled HP 63 or HP 63XL ink cartridge is installed it is normal to receive alerts such as ‘non-genuine cartridge’ or ‘used color/black cartridge’. These may be bypassed by selecting ‘Dismiss’, ‘Ok’, or ‘Continue’.

– Nuisance Messages. After a refilled HP 63 or HP 63XL ink cartridge is detected it is normal to receive alerts such as ‘low on ink’, ‘counterfeit’, ‘used’, ‘fraud’, ‘refilled’, or ‘depleted’ cartridge. These my be bypassed by selecting ‘Dismiss’, ‘Ok’, or ‘Continue’.

HP Nuisance Alert Messages
Following the installation of a refilled ink cartridge, nuisance or annoyance messages will typically be displayed after the initial ‘low ink’ or ‘non-genuine’ ink messages.
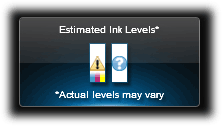
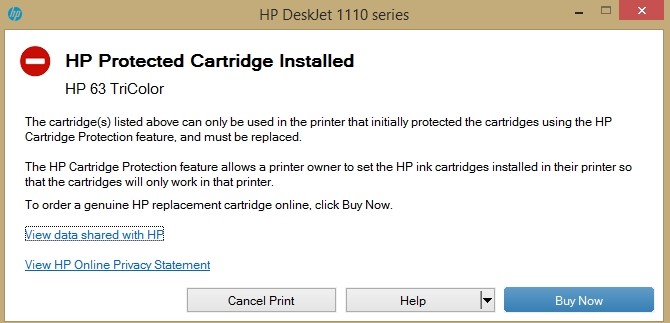
For “HP Protected Cartridge Installed” error messages, click here
—
SEVERE CARTRIDGE ERRORS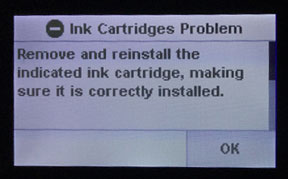
If a “Non-HP Cartridge(s)” or “Very Low on Ink”, or similar message cannot be bypassed then the cartridge may be suffering from marginal internal electrical performance and may need to be replaced with a new one.
It is first suggested to remove and thoroughly clean cartridges electrical contacts & printer flex cable contacts and retest (refer to Printer Maintenance). If the problem persists then return cartridge to your refiller for analysis.
Cartridge Failure Error Messages
- Blinking cartridge lights on the printer.
- A message that says “Cartridge Missing or Not Detected”, “Replace Cartridge”, “Incompatible Print Cartridge”, “Black/Color Cartridge Problem”, or similar, on your monitor or on the printer display.
– Severe Errors. When a HP 63 or HP 63XL ink cartridge has poor connectivity (between contacts and flex cable inside printer) or is suffering from marginal internal micro-electrical performance, you may observe error messages such as ‘replace cartridge’, ‘incompatible cartridges’, ‘print cartridges error’, ‘cartridge missing or not detected’, etc. In addition, the power light may be blinking while the error message is displayed. In some cases, errors can be cleared by removing and cleaning the ink cartridges and printer flex cable contacts. If not, then it is suggested to run the cartridge health diagnostics (‘tap 41’) check or perform a cartridge error bypass (available on select printer models) to confirm that the ink cartridge is damaged.

– Cartridge Electrical Failures. Severe HP 63 or 63XL cartridge errors are primarily caused by an electrical breakdown at the cartridge’s nozzle plate. Ink penetration or corrosion into the nozzle plate will cause a failure of the tiny micro-electronics resulting in a variety of different error messages being displayed.

– Cartridge Diagnostics. The cartridge’s electrical health can be verified by running the ‘Tap 41’ diagnostics at the printer’s control panel (NOTE: not available on all printer models). If the ‘Tap 41’ or ‘Tap 10’ service test print is successful this only means the printer is functional, one (or both) of the ink cartridges may still be electrically damaged and may not support/allow NORMAL print operations to proceed.
NON-TOUCHSCREEN PRINTER MODELS
Validate the cartridge’s electrical health by running the ‘Tap 41’ diagnostics test (refer to 2nd video at the following link so you understand how to analyze the service test report print-out): https://www.inkjet411.com/?page_id=1476
- Turn printer Power ON; wait 15 seconds for printer to fully energize.
- PRESS AND HOLD the Power Button
- Press the Cancel (X) button 4 times
- Press the Scan button once
- Release the Power button. The ‘Tap 41’ test report should print within 30 seconds.
TOUCHSCREEN PRINTER MODELS – PROCEDURE A
A.1.Using two fingers, gently tap the ‘Return’ and ‘Home’ keys on touchscreen until the ‘Support’ Menu is displayed (for example, press the button 3-4 times each in alternating succession). (Refer to HP 60/61 video at the following link as an example of the how to access activate the internal service test print: https://www.inkjet411.com/?page_id=1476 )
A.2. At ‘Support’ menu, select the upper right button until the ‘Reports Menu’ is visible. Select OK.
Press upper right button until ‘print mech button tap’ menu is displayed.
A.3. Press OK, the ‘code = 0’ menu should be displayed.
A.4. Use arrows keys to change value to ‘code = 41′ (i.e. press and hold right arrow key). When ‘code = 41′, select ‘OK’.
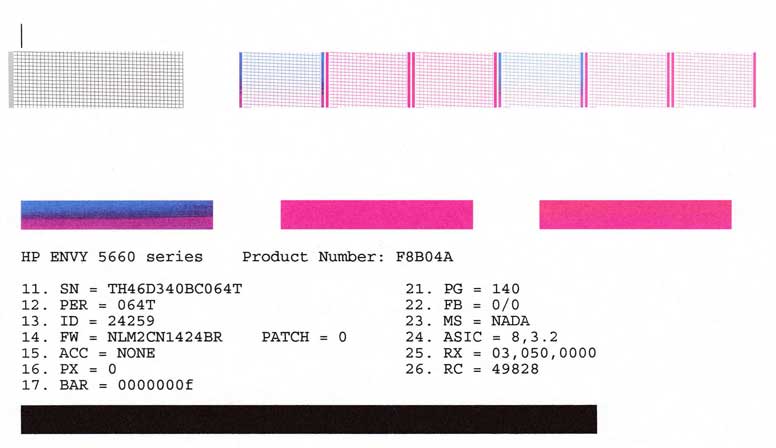
A.5. The diagnostic ‘tap 41’ service test report will print. In the upper/top portion of the service test print, ‘Current Error‘ should state ‘None‘ for a properly functioning ink cartridge.
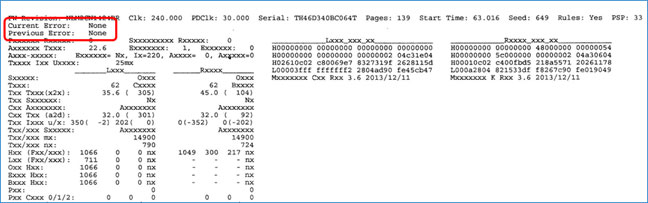
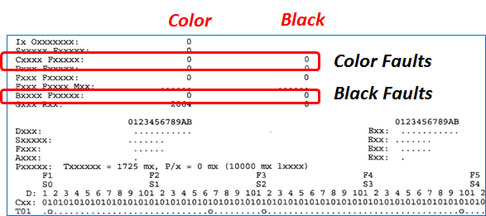
A.6. In the lower portion of the Tap 41 test print, the Black/Color columns should not have any values other than zero (0) displayed. If a value other than zero (0) is displayed in the areas indicated then the cartridge is likely permanently electrically damaged and may need to be replaced with a brand new cartridge. See photo here (under Cartridge Diagnostics section): https://www.inkjet411.com/?page_id=4563
TOUCHSCREEN PRINTER MODELS – PROCEDURE B
B.1. Unplug printer’s power cord.
B.2. Press and hold power button, plug printer power cord in, wait a few seconds until the white light on front of unit is displayed/illuminated, release power button.
B.3. At touchscreen, press the non-illuminated buttons, Back (top left) and Home (lower left), in the following order:
- Back
- Home
- Back
- Back
B.4.The service menu will be displayed.
B.5. At ‘Support’ menu, select the upper right button until the ‘Reports Menu’ is visible. Select OK.
Press upper right button until ‘print mech button tap’ menu is displayed.
B.6. Press OK, the ‘code = 0’ menu should be displayed.
B.7. Use arrows keys to change value to ‘code = 41′ (i.e. press and hold right arrow key). When ‘code = 41′, select ‘OK’.
B.8. The diagnostic ‘tap 41’ service test report will print. In the upper/top portion of the service test print, ‘Current Error‘ should state ‘None‘ for a properly functioning ink cartridge.
B.9.Refer to DIAGNOSTIC TAP 41 video procedure at the following link (see 3rd video) on how to activate and read the service test: https://www.inkjet411.com/?page_id=434
In the lower portion of the Tap 41 test print, the Black/Color columns should not have any values other than zero (0) displayed. If a value other than zero (0) is displayed in the areas indicated then the cartridge is likely permanently electrically damaged and may need to be replaced with a brand new cartridge.
NOTE: The Tap 10 self-test print [i.e. change value to ‘code = 41′ (i.e. press and hold right arrow key). When ‘code = 41′, select ‘OK’], which prints a range of black and color test patterns, may also be initiated via ‘code = 10’ (i.e. using the procedure above). Evaluate printed nozzle stair-step patterns for missing ‘horizontal’ lines. If more than 10% of the horizontal lines are missing, for any given grid, this typically means the respective ink cartridge (i.e. either black or tri-color) is electrically degraded and may not support normal printing.
Recommended Solutions
The contact between the ink cartridge and the printer must be clean for proper functioning. If any dirt, ink or paper dust is on the contacts, the printer may indicate that the ink cartridge is bad. To ensure a clean contact, follow the steps below:
Step 1: Remove and re-install the cartridge
Step 2: Clean the contacts on the printer and the ink cartridge
Step 3: Run a self-test and/or re-set the printer. Refer to Printer Model page (if available) or HP Printer Diagnostics page from the selections above.
Advanced Diagnostics
To view advanced diagnostics tests for your printer, click here:
Poor Print Quality or Missing Colors:
If any streaks or missing colors appear on prints, thoroughly clean the cartridge’s electrical contacts and printer’s flex driver cable surface. If the cartridge is clogged then a warm water flush may be necessary to recover all colors. Click here for instructions.

NOTE 1: Replacing the ink cartridge with a brand new HP original ink cartridge is the best way to verify cartridge/printer performance.
NOTE 2: All integrated ink cartridges being repeatedly refilled eventually do fail. Some cartridges/printers may encounter an unavoidable mechanical or electrical failure which is unrelated to refilling. Check for physical damage on the cartridge. Look at the print cartridge and see if there are any cracks, tears or missing elements. Any one of these can cause a failure. In these cases, you will need to purchase a new cartridge and start the refill process again after it has run out.
Refill Center Locations:
—
For all other questions please feel free to contact us:


